On the Air Blog | Magazine | Podcast | Facebook | Join/Renew
How to Operate FT8
Jeromy Alexander, AD8GN
15 April 2021

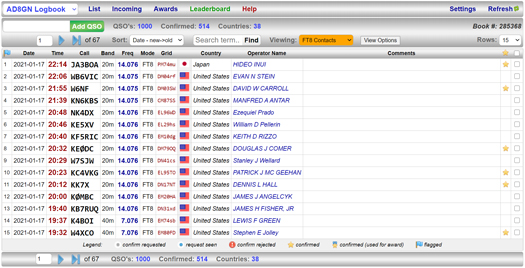
As a new ham there are many projects and areas of amateur radio that I want to jump into all at once. But the idea of exchanging worldwide digital text messages via the FT8 mode was the most exciting to me. Although the amateur radio community might downplay the significance of “just another mode” that can communicate across the globe (like PSK31, RTTY, Olivia, or even CW), as a new amateur radio operator, it amazes me that I’ve been able to exchange messages with people over 6,000 miles away. In total, I’ve contacted people in all 50 US states, Puerto Rico and the US Virgin Islands, Anguilla, Argentina, Belarus, Belgium, Belize, Brazil, Canada, Canary Islands, Columbia, Costa Rica, Cuba, Dominican Republic, Ecuador, England, Finland, France, Germany, Ireland, Italy, Japan, Mexico, Netherlands, Norway, Poland, Portugal, Russia, Slovenia, Spain, Switzerland, Trinidad and Tobago, Ukraine, and Venezuela.

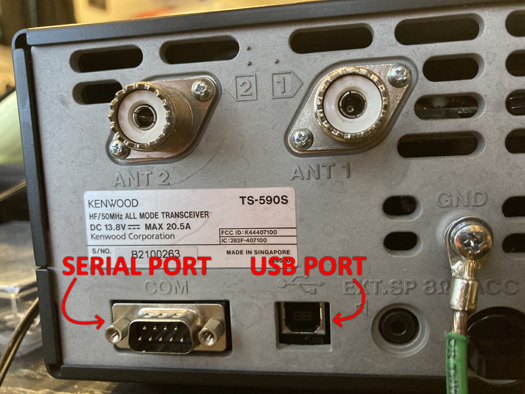
Kenwood 590s showing Serial and USB ports photo
In order to operate FT8, you’ll need:
• An HF transceiver (or receiver/transmitter)
• An operational feed line for your antenna with a grounding system
• A computer
• An audio and command interface between your HF radio and your computer
• Software (I’ll be using WSJT-X)
The Right HF Transceiver
Although any HF transceiver (or receiver/transmitter pair) could work if you know how to use your soldering iron, choosing one with a serial port and a USB port will make operating FT8 a lot easier. The USB and serial ports are similar in that they both allow your computer to receive information from your radio and to send computer-aided transceiver (CAT) commands to the radio (change frequency, modes, settings, program memories, and PTT), however, only the USB port has the additional capability to send sound (audio frequencies) to your computer and to receive sound (mic input) from your computer — both of these are required for FT8. You can still operate on FT8 if your radio only has a serial port and no USB port, but you’ll need to use a soldering iron to build an “easy digi” interface (instructions can be found through an online search), or buy a premade one. They can easily be found on eBay for around $10.

Setting Up Your Computer
You don’t need the newest computer on the market; it just needs to work well and be able to run the software required for FT8. Here are instructions for setting up your computer for FT8 operation using WSJT-X. Although the instructions below are for Windows, software is also available for iOS and Linux.
1. Install the USB drivers for your radio from the manufacturer. You’ll want to do this before connecting your radio, so Windows will automatically install a generic sound driver to assist you when you plug in your computer. If the generic driver doesn’t work, you may need to uninstall it and install the manufacturer’s driver.
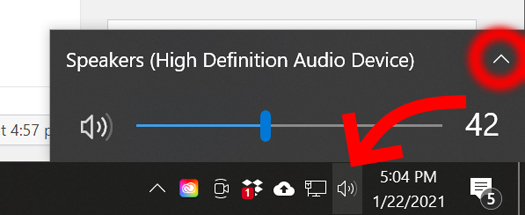
2. Read your radio’s manual to connect it to your computer using a standard USB A-to-B cable. You should hear the Windows tones indicating the connection. If you click the “Speakers” icon on the lower right taskbar and click the “up” arrow, you’ll be able to listen to your radio and know the connection is working. Do that again and change it back so you’ll hear your normal computer audio.

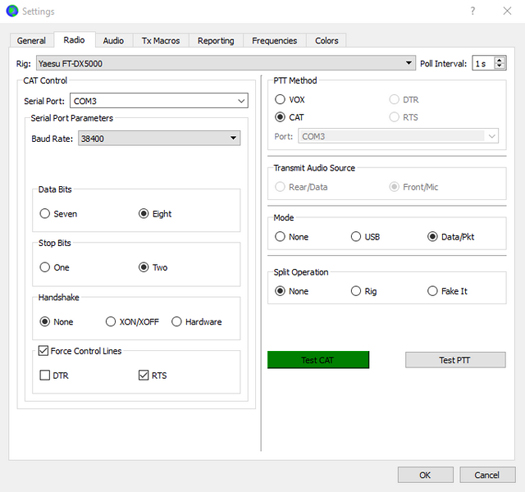
3. Visit the WSJT-X web page (https://physics.princeton.edu/pulsar/k1jt/wsjtx.html) to download and install the appropriate installation package for the latest version of the software for your computer. Windows 10 users can download and install it at this site: https://physics.princeton.edu/pulsar/k1jt/wsjtx-2.2.2-win64.exe. The first time you run the program, it’ll ask for your call sign and grid square, and you’ll need to configure the “Radio” and “Audio” tabs in its settings menu (located in the “File” dropdown menu). In the “Radio” tab, you’ll need to choose your radio from the dropdown menu and press the “Test PTT” button (be prepared to unclick it quickly, as it will actually push-to-talk your radio if it works). If it doesn’t work, you can choose from the various radio selections available to try the different data rates, parity bits, etc., and keep trying the “Test PTT” button. You can also search online for what the FT8 radio settings are for your radio model. Next, you’ll want to configure the “Audio” tab by choosing the proper microphone and speaker settings. To do so, click on the two radio boxes and choose the same as you chose earlier with the Windows speaker setting.
Logging Contacts
After you’ve plugged in your antenna and installed the software, you’re ready to press the “Enable TX” button on the main screen. You can watch as the program sends your CQ and responds through the contact process. At the end of the contact, a window will pop up with a logbook entry pre-filled and ready for you to add any notes before clicking to log it. Press “Enable TX” to repeat the process.
Logging is important. Even if you’re not looking to achieve the ARRL WAS (Worked All States) or WAC (Worked All Continents) awards, your contact might be. An easy way to fulfill that obligation is to visit www.qrz.com and sign up for a free account (if you haven’t already). After logging in, go to the “Logbook” tab (located in the menu under your call sign) and click “Settings” in the call book, then “Import” under the “ADIF Import/Export” heading. Choose and import the ADIF file from WSJT-X’s logging directory (you can open the logging directory from WSJT-X’s file menu). Once the other party does the same, you’ll see your contact is confirmed and your eligibility for various awards will grow.

If you’re looking for a more automated logging process, I recommend using Winlog32 (www.winlog32.co.uk), which is free. When used with a www.qrz.com subscription, WSJT-X can be set to transmit a User Datagram Protocol (UDP) packet, transferring the information for each log entry when you hit the “Log” button. Winlog32 can then be set to enter these packets into your Winlog32 logbook, and automatically upload those contacts to www.qrz.com.
Conclusion
I’ve been extremely satisfied operating FT8, and it was a lot of fun making contacts with so many people across the world. As a new ham, I was able to learn what type of propagation (at least for a weak signal protocol) I could expect out of my system. I’ve also run my radio with a secondary antenna to see if I could compare the differences.
With each contact taking only 1 – 2 minutes, and an endless sea of traffic across the bands, it’s hard not to stay up late chasing another faraway station. I think I’ll spend my next bit of time with my mic, or maybe a key. Pending a few more confirmations, I hope to earn WAS and WAC awards for FT8. I’m glad I took the time to learn this mode, as I’m sure the experience helped me grow as a ham and will help me in my next weak signal digital protocol: Morse code.
For more information, read “FT8 Operating Guide: Weak Signal HF DXing for Technofiles” (https://www.g4ifb.com/FT8_Hinson_tips_for_HF_DXers.pdf).
If you have any questions, comments, or suggestions for improvement, please contact me on the air or email me at [email protected] or https://ad8gn.com.
ARRL Resources for Learning More
Get on the Air with HF Digital, 2nd Edition.
http://www.arrl.org/shop/Get-on-the-Air-with-HF-Digital-2nd-Edition/
Share Your Stories
Whether you are new, an expert or somewhere in between we invite you to take part in the conversation. Share your stories and experiences by emailing [email protected].
Click here to return to the On the Air Blog main page.
News & Features >> On the Air Magazine >> On the Air Blog >> One Thousand FT8 Contacts in 14 Days


